Remove password expiration Office 365

Remove password expiration Office 365

I wrote this powershell script to remove password expiration for all users, so that the users password not expires

Password_expiration.ps1

$Cred = Get-Credential

Read-Host 'Press Enter to continue to Connect to Office 365' | Out-Null
Write-Host "Continueing..."
$s = New-PSSession -ConfigurationName Microsoft.Exchange -ConnectionUri https://ps.outlook.com/powershell -Credential $cred -Authentication Basic –AllowRedirection

Import-PSSession $s

Read-Host 'Press Enter to continue to remove password from expires for all users' | Out-Null
Write-Host "Continueing..."
Connect-MsolService –Credential $cred

Get-MSOLUser | Set-MsolUser -PasswordNeverExpires $true

Read-Host 'Press Enter to exit script, All Done' | Out-Null

Change Retention Policy – Office 365

Change Retention Policy – Office 365

I wrote this powershell script to remove the Retention Policy that delete all emails in Users Deleted Items folder that are older then 30 days

Retention_Policy.ps1

$Cred = Get-Credential

Read-Host 'Press Enter to continue to Connect to Office 365' | Out-Null
Write-Host "Continueing..."
$s = New-PSSession -ConfigurationName Microsoft.Exchange -ConnectionUri https://ps.outlook.com/powershell -Credential $cred -Authentication Basic –AllowRedirection

Import-PSSession $s

Read-Host 'Press Enter to continue to Remove 30 days Deleted Items rule' | Out-Null
Write-Host "Continueing..."
Enable-OrganizationCustomization

Set-RetentionPolicyTag "Deleted Items" -RetentionEnabled $false

Read-Host 'Press Enter to exit script, All Done' | Out-Null

Live migration of ‘Virtual Machine’ failed. Event 21502

Live migration of ‘Virtual Machine1’ failed.

Virtual machine migration operation for ‘Virtual Machine1’ failed at migration destination ‘NodeX’. (Virtual machine ID xxxxxxxx-xxxx-xxxx-xxxx-xxxxxxxxxxxx)

The virtual machine ‘Virtual Machine1’ is using processor-specific features not supported on physical computer ‘NODEX’. To allow for migration of this virtual machine to physical computers with different processors, modify the virtual machine settings to limit the processor features used by the virtual machine. (Virtual machine ID xxxxxxxx-xxxx-xxxx-xxxx-xxxxxxxxxxxx)

fix:
stop VM
Set-VMProcessor “Virtual Machine1” -CompatibilityForMigrationEnabled $true

Move Outlook 2010 AutoComplete Cache / Suggested Contacts

This mini guide explains how to Move Outlook 2010 AutoComplete Cache / Suggested Contacts

Outlook 2010 AutoComplete Cache

old pc:
Close outlook
Go to this folder:

 %LOCALAPPDATA%\Microsoft\Outlook\RoamCache 
( C:\Users\[username]\AppData\Local\Microsoft\Outlook\RoamCache )

look for a file named Stream_Autocomplete_0_xxxxxxxxxxxxxxxx.dat (random number like Stream_Autocomplete_0_1AF176FB82536A41BFE4932FD077DF0F.dat)

if there is more then one, look at the timestam or the size, to select the rigth one

copy the file to the new pc

new pc:
open outlook
send a email to a emailadress that you type in (not using contacts)
close outlook
open outlook
send another mail to the same emailadress, you should see that the autocorret list suggests the email, then close outlook

Go to this folder:

 %LOCALAPPDATA%\Microsoft\Outlook\RoamCache 
( C:\Users\[username]\AppData\Local\Microsoft\Outlook\RoamCache )

look for a file named Stream_Autocomplete_0_xxxxxxxxxxxxxxxx.dat (random number like Stream_Autocomplete_0_1AF176FB82536A41BFE4932FD077DF0F.dat)

if there is more then one, look at the timestam, to select the rigth one

copy the filename and rename the file to eg. Stream_Autocomplete_0_xxxxxxxxxxxxx.dat.Old
copy the stream file from the old outlook to this folder, and rename the file to what the other file name was
open outlook and now you should have your AutoComplete Cache / Suggested Contacts

tips:
Always make a backup of the .dat file, before entering outlook on the new pc. some times (1 out of 50) outlook deletes the file on startup, if this should happens, just copy the file on more time, this time it should work

Create office 365 mail relay connector

Create office 365 mail relay connector

go to https://outlook.office365.com/ecp/ login as global administrator

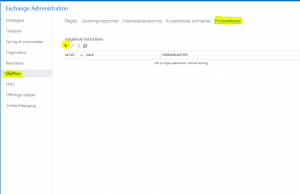
step 1: click Mailflow
step 2: click Connectors
step 3: click Add

Office365AddRelayConnector1

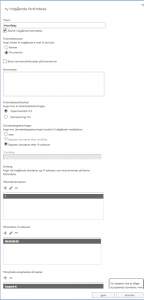
step 4: Give the connector a name (eg. AllowRelay)
step 5: Select On-Premise
step 6: Select Restrict domains by IP addresses
step 7: Set sender domain to *
step 8: Set sender ip to your own Wan ip/public ip (Only static ips is allowed)
step 9: Set Accepted domains to your office 365 domain

Office365AddRelayConnector2

now you can use your own mx record eg. youdomain-com.mail.protection.outlook.com as relay server/smarthost without login, and on port 25
Source: http://technet.microsoft.com/en-us/library/dn554323.aspx

Outlook 2013 Stuck Loading profile

Outlook 2013 Stuck Loading profile

Outlook 2013 Stuck Loading profile1
(Danish)

Disable hardware acceleration

1. Open regedit
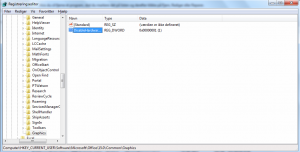
2. Browse to HKEY_CURRENT_USER\Software\Microsoft\Office\15.0\Common
3. Right click on the right panel select “New Key” and name it “Graphics
4. Select Graphics key/folder, right click on the right panel and create a New DWORD (32-bit) Value and name it “DisableHardwareAcceleration”.
5. Set Value to 1

Outlook 2013 Stuck Loading profile reg fix


Source: http://community.spiceworks.com/topic/456531-outlook-2013-hangs-loading-profile
Thanks to: timjohnson2 #2

SBS 2008 / Exchange 2007 – Single Common Name SSL Certificate


#Change this value to match the name of the external certificate
$URLName="mail.example.net"
#Change this value to match the real name of the server
$ComputerName="exch-svr"

Get-ClientAccessServer | Set-ClientAccessServer -AutodiscoverServiceInternalUri https://$URLNAME/autodiscover/autodiscover.xml
Get-WebServicesVirtualDirectory | Set-WebServicesVirtualDirectory -InternalUrl https://$URLNAME/ews/exchange.asmx
Get-OABVirtualDirectory | Set-OABVirtualDirectory -InternalURL https://$URLNAME/OAB -ExternalURL https://$URLNAME/OAB
Get-ActiveSyncVirtualDirectory | Set-ActiveSyncVirtualDirectory -InternalURL https://$URLNAME/Microsoft-Server-ActiveSync -ExternalURL https://$URLNAME/Microsoft-Server-ActiveSync
Set-OutlookAnywhere -identity "$computername\RPC (Default Web Site)" -ExternalHostname $URLNAME

Exchange 2007 (none-SBS):
Set-OWAVirtualDirectory -identity "$computername\owa (Default Web Site)" -InternalURL https://$URLNAME/owa -ExternalURL https://$URLNAME/owa

SBS 2008:
Set-OWAVirtualDirectory -identity "$computername\owa (SBS Web Applications)" -InternalURL https://$URLNAME/owa -ExternalURL https://$URLNAME/owa
Set-UMVirtualDirectory -Identity “$computername\unifiedmessaging (SBS Web Applications)” -InternalUrl https://$URLNAME/unifiedmessaging/service.asmx

Run get-exchangecertificate and note the thumbprint on the new certificate (watch out for dublets!)

Run Enable-exchangecertificate -thumbprint <TUMBPRINT> -services SMTP,IIS,POP,IMAP

Run iisreset

Restart the Microsoft Exchange services

Restart Clients Pc’s
source: http://exchange.sembee.info/2007/install/singlenamessl.asp

Using SRV Record for Exchange 2007/2010 Autodiscover

You can use a SRV record for exchange Autodiscover services, just create a srv record named:

Service: _autodiscover
Protocol: _tcp
Port Number: 443
Host: [Hostname of the server]

Eg.
Host: _autodiscover._tcp.kasperk.it, Port 443, host: mail.kasperk.it

source: http://support.microsoft.com/kb/940881

You can test the configuration here: https://www.testexchangeconnectivity.com/ choosing Outlook Autodiscover

Use Smarthost with Exchange 2003

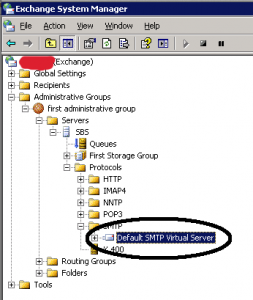
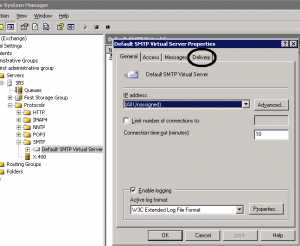
1. Open Exchange System Manager
2. Select [ServerName], click Protocols, and then click SMTP.
3. Right-click the Default SMTP Virtual Server object, and click Properties.


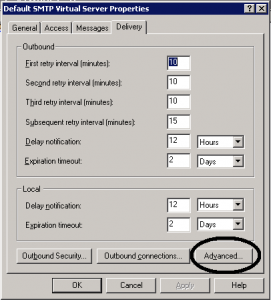
4. Click the Delivery tab

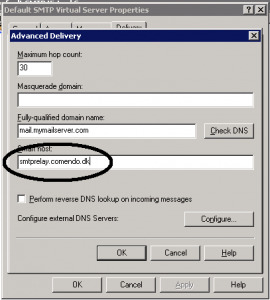
5. Click Advanced

6. Inset the hostname off the smarthost/relay server


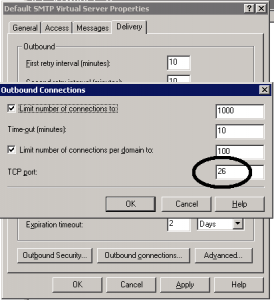
Change Outbound Port:
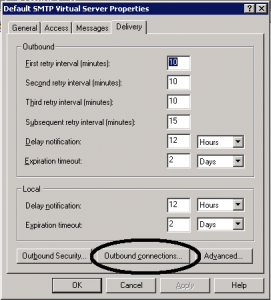
1. Click Outbound connections

2. Change TCP port to 26


Change smtp Receive port Exchange 2003

Here is how you change det Listening port on Exchange 2003

Change Receive Port:
1. Open Exchange System Manager
2. Select [ServerName], click Protocols, and then click SMTP.
3. Right-click the Default SMTP Virtual Server object, and click Properties.
4. On the General tab, click the Advanced button, click the Edit button.

5. Change the port number to port 26

Source: http://support.microsoft.com/kb/274842